Wednesday, July 22, 2015

Wordless Wednesday - Favorite Shots

Messy Messy Mess - My fairy garden has been completely overtaken by tiger lilies, lambs ear, foxglove and hostas.  It's hard for the toddler to look for fairies if he can't even find the fairy garden.  

Tidy Victory - In my search for a missing birthday card with a gift card in it, I was able to tidy up the built-in shelves in the living room (I tend to stuff random things in between the books), the magazine racks and a stack of random papers on the kitchen table (that we don't eat on).  Yay for tidying AND I found the card in my bedroom closet. :)


Dunn's River Sandals Resort, Ocho Rios, Jamaica


Linking up with....


Monday, July 20, 2015

Pretty Frame Ring Holder

Messy Messy Fail - I made lists for my trip with the kids to visit my family - I remembered zippy cups, underwear, swimsuits and ear protection for the Air Show.  What was the only thing I forgot?  The toddler's Blue Bunny which is a sleeping necessity.  Of course I forgot Blue Bunny.

Tidy Victory - We had a successful visit to both mine and my husband's families - no trips to Urgent Care, lots of fun activities, good food and lots of love.


In 2014 (or was it 2013?), a post on Facebook went around about making a homemade gift for the first 5 people who responded to you to show that you appreciated them within the year.  

I was very intrigued by this idea and said to myself, "Myself, I wonder what I could come up with?"

I have since made and delivered a few, but not all.  

I'm still going to finish them (for those of you who are still waiting!).

For one special friend, I had the perfect homemade gift in mind - a pretty frame ring holder.  She was genuinely in love with her engagement and wedding rings when she received them, and I thought this craft would be a cute way to display them.  

I first found the idea on Pinterest here and wanted to try to recreate it for my friend.  Renee at Sassy Wife/Classy Life did a great job of coming up with this unique idea.  I had to try making one myself!

I asked her about the colors in her bedroom (green, white and black) to try to pick colors to match.


To make your own pretty frame ring holder, you need:

a mini picture frame (purchased mine at Michael's from the dollar
   bin in front)
a piece of craft foam
a piece of pretty felt
jewels for blinging
scissors
pencil
glue gun
pretty straight pins


Here's what you need to do:
  • Remove the plastic covering from the frame.  Mine ripped out pretty easily with the exception of a few pieces.  I just used my eyebrow tweezers to get the remaining pieces out.
  • I used the paper that came inside the frame to trace the same shape onto the craft foam.  I then cut that piece out as well as a second the same size.


  • Place the pieces of foam inside the frame and trim as necessary.  Make sure you can close and clasp the frame.  Some of the corners on my mine stuck out a bit due to the foam but that's okay.


  • Use the paper that came inside the frame to trace the same shape onto the felt.  You can really use any fabric, I chose felt so it wouldn't show any holes left from the pin.

  • Place the piece of cut felt on top of the two pieces of foam and secure in the frame with the back closed.  You should be able to see the pretty fabric through the front of the frame.
  • Now the fun part - plug in your hot glue gun and start decorating your frame to fit your recipient's style.  I used faux pearls, green and clear jewels.  I only decorated the two sides of the frames - I didn't want it to get out of control.

As you can see some blinging got a little messy.  Must be neat and tidy!


  • Let your decorations dry.  If there are any misplaced or sloppy jewels you can use the tweezers to take them off and reglue until you are happy.
  • Push your pretty pin in through the felt and foam angled upward to hold rings.  Be careful not to push the pins through the back of the frame.
  • Hang your gorgeous jewelry and admire!


I had so much fun making this for my friend because I was finally able to get my craft on (haven't done that in awhile) and I knew she would like it (hopefully)!

She lives down the street from my mom, Nana Patti, whom I do visit several times a year but I haven't gotten to see J (my friend) in awhile.  We made a special meeting time after she got out of work and I was waking children up so she could stop by for a quick visit and I could give her the homemade gift.

We were originally going to take a walk down to her house to visit her kids too, but the toddler got sick and I didn't want him taking his nastiness to her house.

I think she liked it!


We even got to catch up a bit.  J makes me laugh so hard, I loved making the ring holder for her.

Enjoy making your homemade gift to show someone you care!


Linking up with..........


The Diary of a Real Housewife


Wednesday, July 15, 2015

New Favorite Eyeliner


Messy Messy Fail - I had to drop of the champagne camry (Cecilia) and pick up the truck (Sandra Dee) (I like to give names to inanimate objects, don't ask) at the garage but failed to remember to put the tailgate on the truck up after I loaded all my nonsense into it.  Drove the whole way home with it down.  I wonder if anyone was trying to get my attention to tell me?

Tidy Victory - Great time at story time this morning at the library - we rented another DVD and the toddler was extremely polite to one of the adopted grandmothers who comes to help out.


In case you forgot, I have a blush obsession that I explained in this post.  I haven't purchased any more blush products since then, except for trying some Lancome blush samples when I was looking for new foundation for the wedding (see this post).

I did get some Sephora gift cards for my birthday that I MAY purchase a new blush with - I've been looking at the Tarte Amazonian Clay 12-Hour blush.  We'll see.

I do, however, need to replenish my eyeliner.  I have to wear it on my upper lids when I leave the house - I have very light sparse eyelashes and I look like I do not have any makeup on if I don't put on some eyeliner.

Here are the eyeliners I have tried out so far!


<One> I learned how to put on liquid liner in high school - takes quite the steady hand, and a handful of q-tips.  This liquid liner was my first and has since been my only - L'Oreal Lineur Intense Brush Tip Liquid Eyeliner.  It stays put and really brings out my eyes nicely.  

I used it so much the label wore right off!


Now that I am older and more mature (wink wink) I am looking for a softer look on my eyelids than a sharp liquid liner.  Don't get me wrong, I still wear it when I'm going out for a nice dinner with my husband or drinks with the girls.

Another important point is the liner must STAY PUT!  I've talked about the morrocan oil I use on my eyes which means it can be tricky to keep makeup in place.

<Two> A few trips to Sephora ago, the fun Sephora girl suggested I try Smashbox Always Sharp Waterproof Kohl Liner in Raven ($20.00).  There is a sharpener inside the cap - to sharpen you just twist the eyeliner inside the cap and voila!  I liked the liner - it did stay in place (I use Mary Kay Foundation Primer on my lids to help out with that, too) while giving me a less harsh look.  The price point isn't TOO bad, but definitely a nice treat from my typical drugstore makeup.

Same thing, label is gone, but it's Smashbox I swear.

I used that eyeliner at least 4-6 days a week, and it lasted about 3 months.  Not bad.

<Three> I really liked the Smashbox eyeliner, but I wanted to know if there was a drugstore equivalent.  With one trip to the store, I came home with L'Oreal Infallible Never Fail Eyeliner in black.  It does not stay on my eyelid as long as the Smashbox and the color pigment isn't as deep, but for less than half the cost it will do when I'm just running to the store.


It has a sharpener on one end and a smudged on the other.  I can't really do a smokey look - it just looks like I've been out imbibing in a few too many libations when I do.  I'm more of a clean and classic makeup type.

Fast forward to now - there is no Sephora in my neighborhood and my Smashbox liner is used up.  Out of desperation, I went to Walmart with my L'Oreal coupon and looked for a new liner to use until I could get to Sephora again.  I wanted to try something new so I passed on the Never Fail.

<Four> I found this eye liner and thought I'd give it a try - L'Oreal Infallible Silkissime Eyeliner in black.  And now I'm in love.


It goes on soooooo smoothly for a pencil liner.  It is a self-advancing liner that you use the L'Oreal Dual Sharpener to sharpen (you could probably use a regular sharpener but I haven't tried yet).  And it STAYED for an entire work day!  I'm sold.

This is not to say I won't be purchasing the Smashbox liner again - the self sharpening tip is too convenient not to.  I just really prefer the ease of application with the L'Oreal eyeliner.  Same to say this is my new favorite liner in lieu of not having easy access to the Smashbox liner.

****Update - After using the pencil enough that I had to sharpen it, I discovered that due to the soft nature (it is a liquid pencil, after all) this can be difficult.  A quick google search and I found that A) if you pop the pencil in the freezer for a few minutes then sharpen, it helps a lot  B) a lot of people had a nice sharpener from Ulta or Sephora that also seemed to work better than my itty bitty ELF sharpener.  Try that!

Do you see the pattern with my L'Oreal liners?  A) There is ALWAYS a coupon for L'Oreal in the Sunday paper and B) I think it is the best quality drugstore product makeup-wise.  I find that it applies easiest, stays on longest and has a better color pigment payoff of any of the drugstore brands.

So, stay tuned to see what I purchase at Sephora over the weekend (if I even make it) - I'm sure I won't just be using gift cards.  Do you think they accept small children as payment?  I kid (no pun intended)!


Linking up with......


This Is How We Roll Party Button


Makeup Monday

Monday, July 13, 2015

Homemade Hanging Baskets

Messy Messy Fail - The baby is still wetting through his Luvs diapers nearly every night, so much that his pajamas are saturated every morning.  Yet there he is, smiling in his crib, jumping up and down in his pee-pee soaked clothes.  So it doesn't seem to be the size diaper (moved up from size 3 to 4) but the diaper itself.

Tidy Victory - Back to Sam's Club diapers = no more wet mornings :)


I know I've been teasing about my homemade hanging baskets for the deck (see this post) - I was seeking inspiration with this post a few weeks ago.

So I have finally gotten my act together and made them.  

As I drive around town, the majority of porches and landscaping contain at least one if not multiple hanging baskets.  I wonder how many of them were purchased or put together by hand?

I initially bought two hanging baskets with double peppermint petunias for about $34 right after Memorial Day (in this area, it is a big NO NO to plant before Memorial Day because there is always a frost right before).  They were hanging on either side of the front porch, but then the front porch was removed (front house reno, going slowly) we took them down because there was no way to reach them for watering.  I knew they would have to be watered every day, so now they are hanging on a double shepards hook above the skeletal remains of my dead holly bush.

Attractive isn't it?


Want to make your own hanging baskets?  Here's what you need:

  • a plastic basket with hanger (I've saved them from previous baskets I've purchased)
  • one diaper (borrow one from a friend or neighbor if you don't have diaper wearing kids in the house)
  • potting soil
  • plants - typically at least 3-5 for each basket
  • water (duh!)
  • fertilizer, Bloom Booster my Miracle-Gro is highly recommended


Here's what you do:

  • May sound crazy but I swear - start by placing the diaper in the bottom of the planting basket.  You can fold the ends of the diaper underneath itself to make it fit, and don't worry if it doesn't lie completely flat.


  • Fill the planting basket halfway up the pot with some potting soil.  Don't pat it down or make it to compact yet, you want to give the roots room to spread out.

  • Keeping your plants in their containers, try arranging them on the ground or in the container so you now how you want them planted.  This is really important - the whole look of your basket can be ruined with poor placement.  If you are going to have a variety of plants in your basket, try to keep tall things in the middle and lower/hanging plants around the outside.
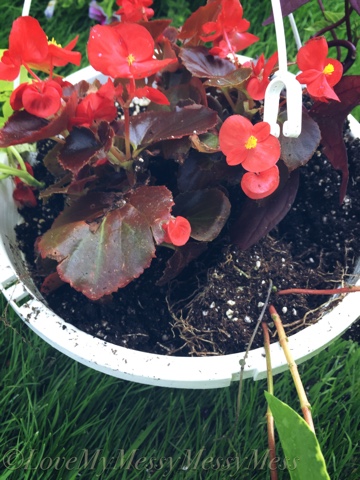
  • After you are satisfied with your placement, start removing the plants from their containers and placing them in the planting basket.  Don't be afraid to pull the roots/dirt on the bottom of the plants loose to help them integrate into their new home more quickly.  I also save the dirt that I remove in a separate pot to use for later.
Bad picture but you get the idea.
  • As your place each plant in your planting basket, start filling in around it with more potting soil/left over dirt.  Make sure when you are done planting there is about an inch of space between the dirt and the top of the planter for water overflow.

  • When your planting basket is complete, give it a good watering.  Be careful not to overwater so that your potting soil overflows.
  • Hang and enjoy!


A few extra tips:
  • After a few days, water your new homemade hanging baskets with Bloom Booster fertilizer.  I typically use this about once a week and it makes a difference!

  • Don't plant too many plants in the basket - you don't want to overcrowd, plants will die.
  • Your basket make seem a bit sparse at first, but it will fill in with proper attention and care and it will look awesome in just a few weeks.  
  • Make sure to clip the ends/deadhead to encourage new growth at the top for a fuller look.
  • Because you put the diaper in the bottom of the basket, water will be retained in the dirt SO MUCH BETTER then in a regular hanging basket.  If you check the basket and the dirt is still moist, no need to water.
I water my store-bought baskets every day WITHOUT FAIL and it is still sometimes not enough.  I typically water my homemade baskets every 3-4 days.  That is time and money saved!

Money spent:
hanging baskets with hangers - FREE (saved from previously bought baskets)
bag of potting soil - 4.99 (and I only used 1/4 or less of it)
plants (three 4 packs of orange/red begonias, 6 potato vine variety,
   3 trailing ivy vines) - 22.58

That's $24.08 for three hanging baskets!  I only accounted for the 1/4 bag of soil I used and didn't count the Bloom Booster because I would have purchased that anyway.  That's a smoking' deal folks! And even better, they will last LONGER than your store bought because of the diaper.  

In the fall, when you go to dump out your baskets, don't forget you put a diaper in there because it's going to be gross!  I just toss that in the garbage, rinse out the basket planters and store for next year.  

ONE MORE TIP - if reusing hanging baskets and the hangers, store them in your basement not your garage - the harsh low temperature of winter can damage the plastic and cause them to break/crack.

Enjoy spending time outside planting!  The toddler helped me with dumping dirt into the baskets while the baby watched from his activity saucer :)  

Try my diaper trick and let me know if it worked for you!


Linking up with......


http://anoregoncottage.com/wp-content/uploads/2015/02/CoHosted-Tuesday-Garden-Party_150.png