 Messy Messy Fail - My husband and I still have our water shoes that we purchased from our honeymoon trip to Jamaica. I knew we would need them again, so I kept them safely tucked away in storage in the basement. Fast forward to now, going on our first family vacation to Cape Cod - perfect time to use our water shoes! I managed to bring both of mine, but only one of my poor husband's. No good.
Tidy Victory - In a desperate last minute attempt to find a bathing suit 12 hours before we were set to leave for our vacation, I ran into TJ Maxx to see what was available. Definitely a disappointingly small selection, although it is the end of July so I shouldn't have been surprised. There was a pretty heinous looking suit in my size - black with a multi-color flower pattern - that I figured it couldn't hurt to try it on. It was a long shot, but low and behold I was pleasantly surprised! Excellent shopping lesson - you can't judge clothing on the hanger!
When joining a blogger Facebook group, there comes responsibilities.
These responsibilities including being a contributor, keeping up with feeds and making sure you are doing your part.
I, however, am not always so prompt on my responsibilities.
Nor do I always have much to contribute.
My new material posts are at an all-time low lately, don't rub it in or anything.
There was ONE thing that came up that I, fortunately, was finally able to contribute to - making an image map.
What, you don't know what an image map is?
Neither did I, until the lovely Alli of Tornadough Alli clued me in (thanks Alli!).
An image map is a graphic that you assign coordinates to, therefore allowing certain areas on the graphic to become a live link.
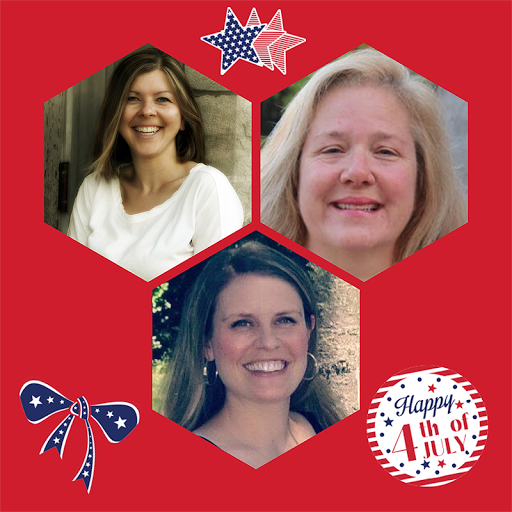
Like this one below for example:

I made the graphic and linked up this image for a a 4th of July Roundup some bloggers from the Facebook group Holiday Fun with Our Blog Friends put together.
As you hover your cursor over each of our faces, our name and blog title should appear. If you click on our face, it will then take you to our blog.
Pretty fun little thing to add to your blog, huh?
This image map technique can be useful for roundup images or headers in your blog.
AND people think your coding is impressive.
So now, I'm going to share with you my secret - creating an image map is actually really easy, just a little time consuming the first few trys.
I always use the website image-maps.com to make mine, nor do you have to register either.
Want to try making your own image map?
Here's what you do:
- Have your image or graphic on your blog server where all of your blog images are stored. I use the platform Blogger and it uses a Picasa Web Album. Make sure it has a good file name for SEO purposes (i.e. chocolate-chip-cookies.png is good for SEO, image-34328.png is not).
- Open up your image on your blog photo server and right click to get the url address for your image.
- Go the the website image-maps.com on your web browser in a seperate window.
- Paste the url address of your image in the blank box where it asks for it. Click “Browse for File”.
- In the next screen your image should appear. Click “click to continue”.
- Follow the directions that appear for bringing up the menu (PC or Mac).
- Time to start mapping - bring up the menu and decide if you want your first link to be a rectangle, circle or polygon. Click whichever shape you would like.
- Rectangle - move the rectangle box that appears over the area you want to link, adjusting the size as necessary. In the options tab that has appeared, paste the website in the “Map URL” box that you would like this rectangle to link to, type the title that you would like to appear when the cursor is over the link in the title box, and any alternative words in the alt box. Next go the the events tab, and change the target to your liking (“_self” will open the link in the same window, “_blank” will open the link in a new window). Under the settings tab, change to your liking (I honestly have never even touched this). Finally click “save”. The area to be linked will appear in red.
- Polygon - Use your cursor to click points where you want your linked area to be. In the options tab that has appeared, paste the website in the “Map URL” box that you would like this polygon to link to, type the title that you would like to appear when the cursor is over the link in the title box, and any alternative words in the alt box. Next go the the events tab, and change the target to your liking (“_self” will open the link in the same window, “_blank” will open the link in a new window). Under the settings tab, change to your liking (I honestly have never even touched this). Finally click “save”. The area to be linked will appear in red. To go back and change any area that you set up, click on the area you set to be linked and click “delete”. Remap your area to be linked.
- Circle - Point and click your cursor in the middle of the circular area where you want your link to be. The coordinates for x and y will appear in the window - click “Save”. Next point and click your cursor to indicate the radius of the circular area where you want your link to be. The radius amount will appear in the window - click “save”. In the options tab that has appeared, paste the website in the “Map URL” box that you would like this rectangle to link to, type the title that you would like to appear when the cursor is over the link in the title box, and any alternative words in the alt box. Next go to the events tab, and change the target to your liking (“_self” will open the link in the same window, “_blank” will open the link in a new window). Under the settings tab, change to your liking (I honestly have never even touched this). The area to be linked will appear in red.
- To go back and change any area that you set up, click on the area you set to be linked and click “delete”. Remap your area to be linked.
- Continue to map all of the areas you want linked using the steps above on your graphic until you are satisfied.
- Right click “options”. The address of your image should appear in the “image source” box. Feel free to change the name of your image map in the “Image Map Name” box.
- Next bring up the menu and click “get code”. Click on the “HTML Code” tab, scroll down and you will see the html code for your image map. COPY ALL OF THE CODE IN THE BOX. If you leave any code out your image map will not work properly.
- Copy the code somewhere safe on your computer - a google doc, a word file and SAVE IT IMMEDIATELY. Because you did not log in to image-maps.com, your code cannot be saved there. Once you close out the image-maps.com window, your code it generated is gone. As long as you have saved the code somewhere on your computer for future use, you are all set. This is because you are hosting your own image, image-maps.com is not.
- Copy and paste the entire code into the HTML window of your blog post where you would like it to appear. When you publish your post, your image will appear and the areas you mapped will be linked.
Here are a few tips to consider when trying to make your image map:
- Make sure you use the same size image on your post as you did when mapping - if you change the size the linked areas will no longer line up.
- The links do not always work well on mobile devices. Because of the change in dimensions on a mobile device the coordinates may change.
- Allow yourself lots of time and start out with less complicated images to link up. As you get the hang of it, it goes much faster.
- The only way to tell for sure if your image map is linking up correctly is to view it on a published post. As soon as your post is published, IMMEDIATELY click on the linked areas of your image map to ensure they are working properly. I had gotten cocky and did not check one of the last image maps I had made and it indeed was not linking properly. Blogger (my platform) was acting up while I was editing my post code and deleted some of the code for the image map without me realizing it.
Are you ready to try making an image map of your own?
Go for it and let me know how it goes for you.
I also have these same directions typed out in this
Please remember this is all for personal use only.
How are my directions? Any other tips or thoughts to share?
Try making an image map for your Facebook blogger group!
Good luck mapping and always remember:
Don't be a hater, be a PARTICIPATOR!
(mic drop)


