
Tidy Victory - Back to Sam's Club diapers = no more wet mornings :)

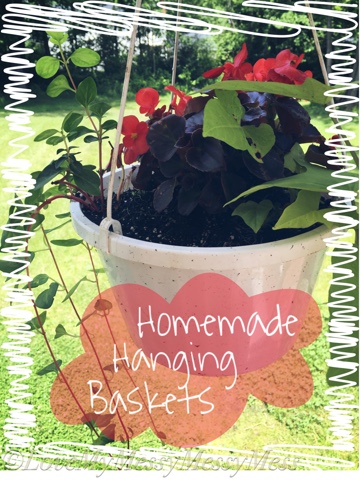
I know I've been teasing about my homemade hanging baskets for the deck (see this post) - I was seeking inspiration with this post a few weeks ago.
So I have finally gotten my act together and made them.
As I drive around town, the majority of porches and landscaping contain at least one if not multiple hanging baskets. I wonder how many of them were purchased or put together by hand?
I initially bought two hanging baskets with double peppermint petunias for about $34 right after Memorial Day (in this area, it is a big NO NO to plant before Memorial Day because there is always a frost right before). They were hanging on either side of the front porch, but then the front porch was removed (front house reno, going slowly) we took them down because there was no way to reach them for watering. I knew they would have to be watered every day, so now they are hanging on a double shepards hook above the skeletal remains of my dead holly bush.
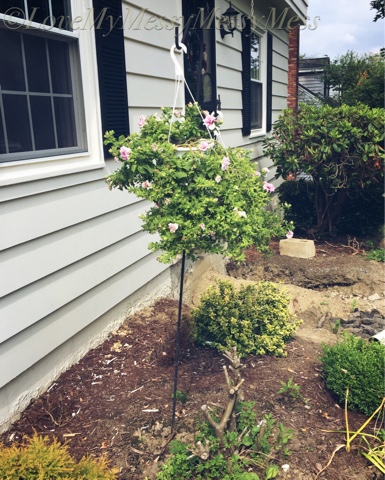 |
| Attractive isn't it? |
Want to make your own hanging baskets? Here's what you need:
- a plastic basket with hanger (I've saved them from previous baskets I've purchased)
- one diaper (borrow one from a friend or neighbor if you don't have diaper wearing kids in the house)
- potting soil
- plants - typically at least 3-5 for each basket
- water (duh!)
- fertilizer, Bloom Booster my Miracle-Gro is highly recommended
Here's what you do:
- May sound crazy but I swear - start by placing the diaper in the bottom of the planting basket. You can fold the ends of the diaper underneath itself to make it fit, and don't worry if it doesn't lie completely flat.
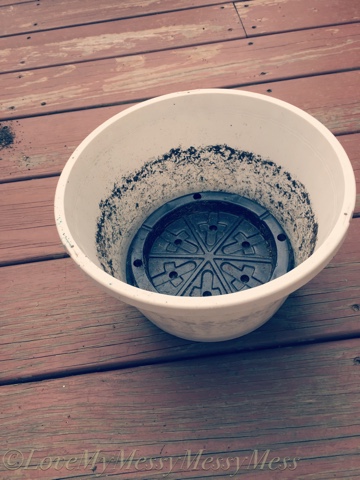

- Fill the planting basket halfway up the pot with some potting soil. Don't pat it down or make it to compact yet, you want to give the roots room to spread out.

- Keeping your plants in their containers, try arranging them on the ground or in the container so you now how you want them planted. This is really important - the whole look of your basket can be ruined with poor placement. If you are going to have a variety of plants in your basket, try to keep tall things in the middle and lower/hanging plants around the outside.
- After you are satisfied with your placement, start removing the plants from their containers and placing them in the planting basket. Don't be afraid to pull the roots/dirt on the bottom of the plants loose to help them integrate into their new home more quickly. I also save the dirt that I remove in a separate pot to use for later.
 |
| Bad picture but you get the idea. |
- As your place each plant in your planting basket, start filling in around it with more potting soil/left over dirt. Make sure when you are done planting there is about an inch of space between the dirt and the top of the planter for water overflow.

- When your planting basket is complete, give it a good watering. Be careful not to overwater so that your potting soil overflows.

- Hang and enjoy!

A few extra tips:
- After a few days, water your new homemade hanging baskets with Bloom Booster fertilizer. I typically use this about once a week and it makes a difference!

- Don't plant too many plants in the basket - you don't want to overcrowd, plants will die.
- Your basket make seem a bit sparse at first, but it will fill in with proper attention and care and it will look awesome in just a few weeks.
- Make sure to clip the ends/deadhead to encourage new growth at the top for a fuller look.
- Because you put the diaper in the bottom of the basket, water will be retained in the dirt SO MUCH BETTER then in a regular hanging basket. If you check the basket and the dirt is still moist, no need to water.
I water my store-bought baskets every day WITHOUT FAIL and it is still sometimes not enough. I typically water my homemade baskets every 3-4 days. That is time and money saved!
Money spent:
hanging baskets with hangers - FREE (saved from previously bought baskets)
bag of potting soil - 4.99 (and I only used 1/4 or less of it)
plants (three 4 packs of orange/red begonias, 6 potato vine variety,
3 trailing ivy vines) - 22.58
3 trailing ivy vines) - 22.58
That's $24.08 for three hanging baskets! I only accounted for the 1/4 bag of soil I used and didn't count the Bloom Booster because I would have purchased that anyway. That's a smoking' deal folks! And even better, they will last LONGER than your store bought because of the diaper.
In the fall, when you go to dump out your baskets, don't forget you put a diaper in there because it's going to be gross! I just toss that in the garbage, rinse out the basket planters and store for next year.
ONE MORE TIP - if reusing hanging baskets and the hangers, store them in your basement not your garage - the harsh low temperature of winter can damage the plastic and cause them to break/crack.
Enjoy spending time outside planting! The toddler helped me with dumping dirt into the baskets while the baby watched from his activity saucer :)
Try my diaper trick and let me know if it worked for you!
Try my diaper trick and let me know if it worked for you!

Linking up with......


